Key Points
- Measure roof dimensions and inspect for damage to ensure proper material sizing and preparation.
- Clean the roof surface thoroughly and allow it to dry before installation.
- Lay out the EPDM membrane, allow it to relax for 30 minutes, and align it carefully.
- Apply adhesive evenly with a roller and press the membrane from the center outward to avoid air bubbles.
- Conduct regular maintenance checks and clean debris to prolong the EPDM roof's life.
Assessing Your Roofing Needs
Evaluating your roofing needs is the first vital step in a successful DIY EPDM roof installation.
Before you plunge into it, you'll need to assess several aspects of your current roof to guarantee you're fully prepared.
First, determine the size of the roof by measuring its length and width. This will help you calculate the amount of EPDM rubber roofing material you'll need.
Next, inspect the condition of your roof deck.
Look for signs of rot or damage. It's pivotal to repair any issues here before proceeding, as the integrity of your installation depends on a solid foundation.
Also, check for any existing leaks and water damage.
Identifying and addressing these problems now will prevent future headaches.
Consider the structure's slope as well.
EPDM is ideal for flat or slightly sloped roofs.
If your roof has a steep slope, this material mightn't be the best option.
Finally, think about the climate in your area.
EPDM performs well in various weather conditions, but understanding your specific environment helps in planning for potential challenges.
Choosing Quality EPDM Materials
After evaluating your roofing needs, the next step is selecting high-quality EPDM materials for your project.
You'll want materials that not only fit your budget but also provide longevity and reliability.
Choosing the right EPDM can make a huge difference in how well your roof stands up to environmental factors such as UV rays, temperature fluctuations, and severe weather conditions.
Five key considerations to keep in mind when picking EPDM materials:
- Thickness of the Membrane: Typically, thicker membranes offer better durability and resistance to punctures. Choices usually range from 45 mils to 90 mils.
- Warranty Options: Look for products with longer warranty periods that cover potential defects and performance issues.
- Manufacturer Reputation: Choose materials from well-established manufacturers with positive reviews and a proven track record.
- Fire and Wind Uplift Ratings: Verify the material meets local fire codes and is tested for wind resistance, vital for safety and compliance.
- Energy Efficiency: Opt for EPDM that has a high Energy Star rating to reduce cooling costs and improve your home's energy efficiency.
Tools and Equipment Required
You'll need a variety of tools and equipment to successfully install your EPDM roof.
First, a utility knife and scissors are essential for cutting the EPDM membrane accurately to fit your roof.
You'll also need a measuring tape to verify your cuts are precise and that the material aligns perfectly with your rooftop dimensions.
A roller is vital for applying the adhesive evenly and securing the membrane without air bubbles.
Make sure to have a few extra rollers on hand, as they can wear out during the process.
For smoothing out the membrane and guaranteeing strong adhesion, a hand roller or seam roller will be necessary.
Don't forget the importance of a chalk line for marking straight lines across the rooftop, guaranteeing your membrane placement is aligned and straight.
A caulking gun is also needed for applying sealant around edges and in corners to prevent water from seeping underneath the membrane.
Lastly, protective gear such as gloves and safety glasses are essential to safeguard yourself from adhesives, sealants, and any accidental cuts or scrapes.
Verifying you have this equipment ready before you begin will make your EPDM installation smoother and more efficient.
Preparing the Roof Surface
Before installing your EPDM roofing, it's crucial to prepare the roof surface properly. This step guarantees that your new roof will adhere well and last for years.
First, you'll need to thoroughly clean the roof. Remove all debris, dust, and dirt. This includes sweeping off leaves, twigs, and any loose material.
It's essential that the surface is spotless to prevent any imperfections under the EPDM membrane.
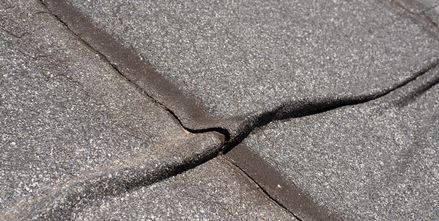
Next, check the roof for any signs of damage. Look for cracks, blisters, or loose material that may need repair.
Addressing these issues now will save you trouble later.
If your roof has old patches or repairs, assess whether they're still effective or need replacing. It's better to start with a clean slate than to build on potentially weak areas.
Lastly, verify that the roof is completely dry. Moisture can be a significant adversary in installing EPDM roofing, as it can prevent proper adhesion.
To summarize, here's what you need to focus on:
- Clean thoroughly: Verify no debris, dust, or residues remain.
- Inspect for damage: Repair any issues such as cracks or blisters.
- Remove old repairs: Replace ineffective patches.
- Verify dryness: Moisture can interfere with adhesion.
- Check the edges: Secure or repair any loose edges to provide a smooth surface for the EPDM.
Installing EPDM Sheets
Now that your roof surface is properly prepared, let's move on to installing the EPDM sheets.
Begin by carefully rolling out the EPDM sheet over the area you've prepped. Make sure you align it well; you don't want to have to adjust it once it's in place, as this can cause unnecessary stress on the material.
Once the sheet is laid out flat, allow it to relax and flatten further for about 30 minutes. This step helps eliminate any wrinkles or bubbles that might've formed during unpacking and positioning.
While you're waiting, double-check the alignment along the edges and corners to guarantee full coverage without overlaps.
Next, fold back half of the EPDM sheet to expose the underlying roof surface.
You'll need to apply adhesive, which should be spread evenly with a roller. Start from the center and move toward the edges, making sure you've got a consistent layer without pooling.
Carefully lay the folded half back down onto the adhesive, pressing from the center outwards to avoid trapping air.
Repeat the process with the other half of the EPDM sheet, certifying both sides bond well with the adhesive.
Sealing and Waterproofing
After successfully laying down the EPDM sheets, it's essential to focus on sealing and waterproofing to guarantee your roof remains robust and leak-free.
This stage is pivotal as it guarantees that no water penetrates your roof, potentially causing damage to your home.
Sealing the seams between the EPDM sheets correctly is the first step. You'll need to apply a specialized seam adhesive which forms a permanent, watertight bond.
Make sure the surfaces are clean and dry before application to maximize adhesion.
- Use Seam Tape: Apply pressure-sensitive seam tape along the edges of the EPDM sheets. This helps create a secure and continuous barrier against moisture.
- Apply Lap Sealant: After the seam tape, reinforce it with lap sealant along the borders for extra protection.
- Check for Bubbles: After sealing, inspect the surface and press out any air bubbles that might've formed under the membrane.
- Secure Edge Sealing: Seal the edges of the roof where the EPDM meets other materials, like walls or gutters.
- Regular Inspections: Even after installation, regular checks are necessary to maintain the integrity of the sealing.
Adding Finishing Touches
With the sealing and waterproofing complete, you're ready to add the finishing touches that will enhance both the function and aesthetic of your new EPDM roof.
Start by checking the edges and seams one last time to verify everything is securely bonded. You'll want to add a stone or paver walkway if your roof will be accessed regularly. This not only protects the membrane but also provides a safer path for you to walk on.
Now, consider installing a drip edge if you haven't already. This simple addition helps direct water off the roof, protecting the underlying structures.
Choose a color and style that matches your home's exterior for a seamless look.
For added protection and to extend the life of your roof, think about applying a UV-protective coating. This will keep the rubber from degrading in the sun and maintain its elasticity, guaranteeing it remains effective against water penetration.
Finally, add roof penetrations if necessary, such as vent pipes or skylights. Use compatible flashing and sealants to maintain the integrity of the waterproof barrier.
Trim and fit each element carefully to avoid any gaps.
These steps will help you achieve a professional-quality finish, guaranteeing your roof remains sturdy and visually appealing for years to come.
Maintenance and Care Tips
Regular maintenance can substantially prolong the lifespan of your EPDM roof and guarantee it continues to perform at its best.
Taking care of your roof isn't just about dealing with problems as they arise; it's about preventing them in the first place. By keeping up with regular checks and maintenance, you'll certify your roof remains in top condition for years to come.
Inspect Regularly: Check your roof at least twice a year and after any severe weather. Look for signs of wear, such as cracks or bubbles.
Clean Debris: Remove leaves, twigs, and other debris. This prevents buildup that can retain moisture and damage the roof surface.
Check Drainage: Verify that gutters and downspouts are clear of obstructions so water can flow freely away from your roof.
Repair Promptly: Address any damage or issues as soon as possible to prevent worsening. Small punctures or tears can be fixed with an EPDM patch kit.
Avoid Harsh Chemicals: Use only cleaners specified for EPDM roofing to avoid damaging the material.
With these tips, you'll keep your roof in excellent condition, minimizing the need for costly repairs or replacements down the line.
Rounding Up
Remember to regularly check and maintain your roof to guarantee it stays in top shape. Keep an eye out for any wear or tears, and address them promptly. With the right care, your new roof will provide reliable protection for years to come.


