You'll find that heat-welded seams are the backbone of any successful PVC roofing system. These essential junctures form molecular bonds that create a single, impenetrable membrane across your entire roof. While they might look simple on the surface, there's a fascinating complexity to how these seams work and why they're superior to other joining methods. Let's explore what makes these bonds so vital for your roof's long-term protection.
Key Points
- Heat-welded seams create molecular fusion between PVC sheets, forming bonds stronger than the original membrane material through high-temperature bonding.
- Properly welded seams provide complete waterproofing and weatherproofing, preventing leaks and maintaining roof system integrity over time.
- Quality control testing ensures seam reliability through probe tests, destructive testing, and non-destructive methods like infrared scanning.
- Regular maintenance and inspection of heat-welded seams extend roof life and prevent costly repairs from seam deterioration.
The Science Behind Heat-Welded Seams
When PVC membrane sheets are joined through heat welding, a molecular fusion occurs between the two surfaces at temperatures reaching 538°C. The intense heat causes the PVC material to melt and flow together, creating a bond that's stronger than the membrane itself.
You'll find that during the welding process, a specialized hot-air welder applies concentrated heat while rollers apply pressure to the overlapped sheets. This combination of heat and pressure creates a chemical reaction where the polymer chains from both sheets interlock and fuse.
Once cooled, you can't separate these seams without destroying the membrane. Unlike adhesive-based seams, heat-welded joints don't rely on glues or tapes that can break down over time.
They're waterproof, weatherproof, and maintain their integrity throughout the roof's lifespan.
Common Types of PVC Roofing Seams
PVC roofing systems feature three primary seam types: overlap seams, T-joints, and end laps.
Overlap seams, which you'll find most commonly, occur where two sheets of membrane overlap and are welded together along their edges. These seams typically require a minimum 32mm weld width for maximum strength.
T-joints form where three layers of membrane intersect, creating a T-shaped pattern. You'll need to pay special attention to these joints, as they're more vulnerable to water infiltration and often require additional sealant or patches for reinforcement.
End laps are created when you join two sheets of membrane at their ends rather than their sides. They require a wider overlap area, usually 150mm, and careful attention to welding temperature to guarantee proper bonding.
Essential Equipment for Heat Welding
To create these professional seams in PVC roofing, you'll need specialized heat-welding equipment. The most important tool is a hot-air welder, available in both automatic and hand-held versions.
Automatic welders work best for long, straight seams, while hand welders tackle detail work and flashings.
You'll also need silicon and steel rollers to compress the heated seams, ensuring proper fusion. A probe tester helps verify seam integrity, while metal scissors and utility knives cut and trim the membrane.
Don't forget your temperature gauge to monitor welding heat, typically between 900-1100°F.
Other essential items include extension cords rated for the welder's power requirements, cleaning supplies to prep the membrane, and safety gear like heat-resistant gloves and safety glasses.
Keep spare heating elements and nozzles handy for unexpected replacements.
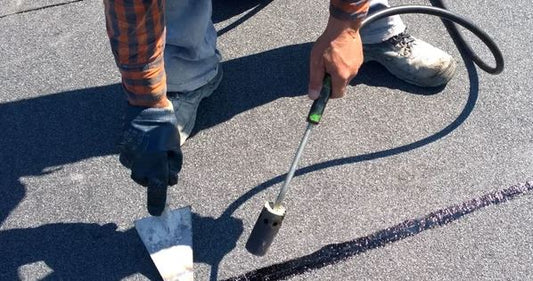
Proper Heat Welding Techniques
The success of heat-welded seams depends on mastering three critical factors: temperature, speed, and pressure.
You'll need to set your heat welder between 900°F and 1100°F, adjusting based on weather conditions and membrane thickness. In cold weather, increase the temperature; in hot weather, decrease it.
Move the welder at a steady pace of around 3metres per minute, maintaining consistent speed throughout the seam. You'll know you're moving at the right speed when you see a small bead of melted material forming at the edge of the seam.
Apply firm pressure with the roller immediately behind the welder to guarantee proper fusion. If you're getting wrinkles or gaps, you're either moving too fast or not applying enough pressure.
Quality Control and Testing Methods
After completing your heat-welded seams, you'll need to verify their integrity through systematic testing.
You should conduct a physical probe test once the seam has cooled to ambient temperature, typically 20-30 minutes after welding. Use a rounded probe tool to check for voids or weak spots along the entire seam length.
For critical projects, you'll want to perform destructive testing on sample sections. Cut a 50mm wide strip across the seam and pull it apart. A properly welded seam should show material failure before the weld fails.
You can also use non-destructive methods like infrared scanning or electric field vector mapping to detect potential leaks. Document all test results and mark any areas that need repairs immediately to maintain the roof's watertight integrity.

Environmental Factors Affecting Seam Performance
While heat-welded seams can create strong bonds in PVC roofing, environmental conditions greatly impact their performance and durability.
You'll need to take into account temperature fluctuations, which can cause thermal expansion and contraction, potentially stressing the seams over time. Heavy rainfall, UV exposure, and extreme heat can also affect seam integrity.
Wind uplift presents another essential factor you must factor in, as it can create pressure differentials that test seam strength.
In areas with high pollution or chemical exposure, you'll find that seams may degrade faster than expected. Snow and ice accumulation can create additional stress through freeze-thaw cycles and weight loads.
To guarantee long-term seam performance, you'll want to factor in your local climate conditions during both installation and maintenance planning.
Troubleshooting Seam Failures
Since PVC roofing seam failures can lead to serious water infiltration issues, identifying and diagnosing problems early is essential.
You'll need to look for common signs like membrane separation, bubbling, or discoloration along the seams. If you notice these issues, probe the seam edges with a blunt tool to check for gaps or weak spots.
When you find a problematic seam, first determine the cause. Poor welding temperature, incorrect speed, or contaminated surfaces during installation are frequent culprits.
You can verify weld quality by performing a destructive test on a small section. If you discover inadequate fusion, you'll need to clean the area thoroughly and reweld the seam.
For older roofs, you might need to apply a seam primer before attempting repairs.
Maintenance and Inspection Guidelines
Because regular inspections can prevent costly repairs, you'll need to establish a thorough maintenance schedule for your PVC roofing seams.
Plan quarterly visual inspections to check for discoloration, separation, or signs of wear along the seams. Look closely at areas around penetrations, corners, and junctions where stress is highest.
Test seam integrity annually using a specialized probe tool. You'll want to verify the weld's strength and identify any weak spots before they fail.
Clean the seams regularly to remove dirt and debris that could compromise their performance. If you notice any issues, don't wait - address them immediately to prevent water infiltration and structural damage.
Document all inspections and repairs to track patterns and predict potential problems before they escalate.
Best Practices for Long-Term Seam Durability
Regular maintenance provides a foundation, but implementing proven best practices maximizes the lifespan of your PVC roofing seams.
You'll need to guarantee proper installation temperature conditions, typically between 4°C and 32°C, as extreme temperatures can compromise weld quality. Keep your welding equipment well-maintained and calibrated, checking settings daily before use.
Always clean and dry the seam areas thoroughly before welding, removing any dirt, debris, or moisture that could affect bond strength.
You should test sample welds at the start of each workday and after significant weather changes. Don't rush the cooling process - let seams set completely before stress testing.
When possible, schedule installations during moderate weather conditions and protect work areas from precipitation.
These practices will help guarantee your heat-welded seams remain strong and watertight throughout their service life.

Rounding Up
You'll find that understanding heat-welded seams in PVC roofing is essential for any roofing project's success. By following proper techniques, maintaining quality control, and adhering to industry standards, you can guarantee your seams remain strong and watertight. Remember to conduct regular inspections and address any issues promptly. With the right knowledge and attention to detail, you'll achieve durable, long-lasting PVC roofing installations.