You'll need to follow specific steps to properly install a PVC single-ply roofing membrane. Start by evaluating safety hazards and preparing the substrate, verifying it's clean, dry, and properly repaired.
Install insulation boards in a staggered pattern, then lay out your membrane sheets with appropriate overlap, starting from the lowest point. Secure the membrane using mechanical fasteners, adhesives, or ballasting methods.
Weld all seams carefully, install proper flashing at penetrations, and apply edge finishing techniques. Complete the installation with systematic quality control checks, including water testing and seam inspections. Professional installation techniques guarantee your roofing system's long-term performance and durability.
Key Points
- Clean and prepare the roof substrate thoroughly, removing debris and addressing any gaps, cracks, or protrusions.
- Install insulation boards in a staggered pattern, ensuring proper R-value requirements and protection from moisture.
- Position PVC membrane sheets with proper overlap, starting from the lowest point and staggering end laps.
- Secure membrane using mechanical fasteners, full adhesion, or ballasting methods, then heat-weld all seams properly.
- Install flashing around penetrations, mechanically fasten edge metal, and conduct thorough quality control inspections and water testing.
Required Tools and Materials
Professional installation of a PVC single-ply roofing membrane requires specific tools and materials to guarantee proper application and long-term performance. You'll need a heat welder with appropriate tips, seam probes, metal scissors, utility knives, and silicone rollers to ensure material compatibility and proper adhesion throughout the installation process.
Your materials list should include the PVC membrane itself, compatible bonding adhesive, lap sealant, metal termination bars, fasteners, and appropriate cleaners. It's vital to verify that all components meet manufacturer specifications for weather resistance and longevity benefits. You'll also require safety equipment including gloves, safety glasses, and appropriate footwear.
Additional essential tools include measuring tape, chalk lines, T-square, moisture meter, and a proper substrate cleaning system. For substrate preparation and detail work, you'll need a power drill, screw gun, and various trowels. Don't forget to include membrane patches, corner pieces, and pipe boots for flashing details. Remember that using manufacturer-approved materials ensures warranty compliance and optimal system performance.
Storage containers for tools and a first-aid kit should also be readily available on-site.
Safety Precautions and Preparation
Before commencing any PVC roofing installation, you must assess and address all potential safety hazards on the worksite. Inspect the structural integrity of the roof deck, identify power lines, and establish clear access points. Don't proceed with installation during wet conditions, high winds, or if temperatures fall outside the manufacturer's recommended range.
Confirm you're wearing proper safety gear, including non-slip boots, heavy-duty gloves, eye protection, and a fall protection harness when working at heights. You'll need to secure the harness to an approved anchor point that can support at least 5,000 pounds of force. Set up roof access points with properly secured extension ladders that extend at least three feet above the roof edge. Place ladder bases on stable, level ground at a 75-degree angle.
Clear the work area of debris and establish designated zones for tools and materials. If you're working with adhesives or primers, verify proper ventilation and keep fire extinguishers nearby. Set up safety warning lines six feet from roof edges and mark any skylights or weak areas that can't support weight.
Test all electrical equipment for proper grounding before use.
Inspecting and Preparing the Substrate
Proper substrate examination and preparation form the base of a successful PVC roofing installation. Before commencing the membrane application, you'll need to conduct a thorough surface assessment to identify any potential issues that could jeopardize the roof's integrity. Check for structural damage, moisture infiltration, and areas of deterioration that necessitate repair.
Commence your substrate cleaning by eliminating all debris, dirt, and loose materials from the roof surface. Utilize a power washer or stiff-bristled broom to guarantee complete elimination of contaminants. Pay special attention to corners, joints, and shifts where debris tends to accumulate.
You'll need to address any sharp edges, fasteners, or protrusions that could puncture the PVC membrane.
Once cleaned, scrutinize the substrate for proper slope and drainage. Confirm that all existing flashings, penetrations, and terminations are secure and in good condition. Fill and repair any gaps, cracks, or uneven areas using suitable patching materials.
The substrate must be completely dry before proceeding with membrane installation. Use moisture meters to confirm acceptable moisture levels, especially when working with concrete or wood substrates.
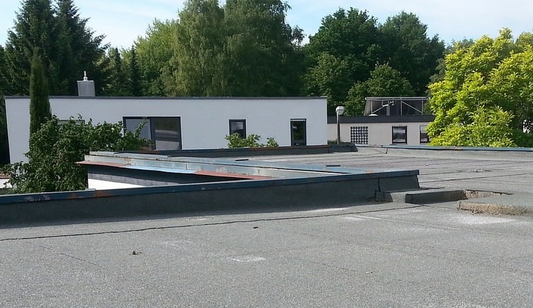
PVC Membrane Layout Techniques
The layout phase of PVC membrane installation requires careful planning and execution to achieve peak performance. Begin by establishing your roof layout plan, verifying you've accounted for all penetrations, drains, and roof edges. You'll need to position the membrane sheets with a minimum 6-inch overlap for proper heat welding at the seams.
Start at the lowest point of the roof and work your way up, unrolling the PVC membrane perpendicular to the slope when possible. Position each sheet so that water flows over, not against, the seams. You'll want to allow the membrane to relax for 15-30 minutes before securing it, which helps prevent wrinkles and guarantees proper alignment.
When laying out multiple sheets, stagger the end laps by at least 3 feet to avoid creating areas where four sheets might intersect. Keep your heat welding zones clean and dry throughout the process.
Mark your overlap areas with chalk lines to maintain straight seams, and position mechanical fasteners according to your wind uplift calculations. Remember to account for expansion and contraction by avoiding fully adhered membranes across expansion joints.
Securing the Membrane
Securing PVC roofing membrane requires three primary attachment methods: mechanical fastening, full adhesion, or ballasting.
For mechanical fastening, you'll need to install metal plates and screws through the membrane's edge into the roof deck at specified intervals. Guarantee proper spacing according to wind uplift requirements and manufacturer specifications.
When using full adhesion, apply the bonding adhesive evenly to both the substrate and membrane's underside using a roller or sprayer. Wait for the adhesive to become tacky before joining the surfaces. You'll need to roll the entire surface with a weighted roller to confirm complete contact and eliminate air pockets.
For ballasted systems, you'll loose-lay the membrane and secure it with river rock or concrete pavers at a specified weight per square foot. Don't forget to perform seam testing at all joints using a probe or non-destructive testing equipment to verify watertight connections.
Regardless of the attachment method, you must properly secure the membrane's perimeter and penetrations using appropriate termination bars, metal flashings, or approved fastening systems. Always follow the manufacturer's installation guidelines for specific requirements and warranty compliance.

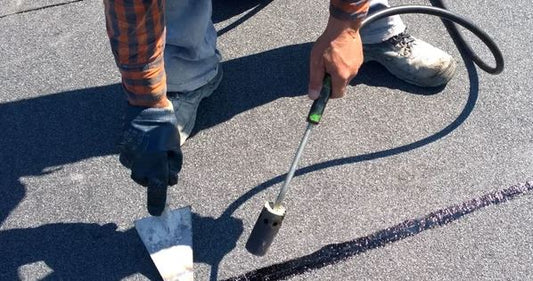
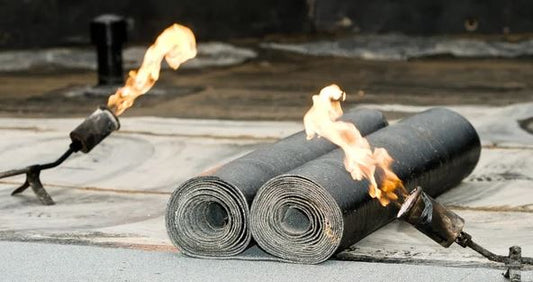
Seam Welding Procedures
Proper seam welding forms the critical foundation of an airtight PVC roofing system. You'll need to master specific seam welding techniques using proper tools to attain long-lasting, secure bonds between membrane sections.
Single Ply requires the use of hot air welding to melt and bond both layers. A pressure roller integrates the moulten PVC and as it coolsinstantly the two layers become one forming an immensely strong, permanent and watertight seal.
Flashing and Edge Details
Critical flashings and perimeter details represent vulnerable points in your PVC roofing system that demand meticulous attention. You'll need to install proper flashing at all roof penetrations, including pipes, drains, and HVAC units, guaranteeing a watertight seal that prevents water infiltration.
Begin by cutting and fitting PVC membrane pieces that extend at least 8 inches up vertical surfaces and 4 inches onto the horizontal roof plane.
Apply edge finishing techniques along the roof's perimeter using pre-manufactured components or field-fabricated metal edge details. You'll need to mechanically fasten the edge metal through the membrane and into the substrate, spacing fasteners no more than 12 inches apart. Then, heat-weld a PVC cover strip over the metal edge's flange, extending at least 1.5 inches beyond the fastener plates.
For inside and outside corners, install pre-formed flashings or carefully cut and fold field-fabricated pieces to guarantee complete coverage. Heat-weld all flashing seams using the same techniques you used for the field membrane, maintaining consistent temperature and pressure to achieve proper fusion.
Quality Control and Testing
Thorough quality control measures secure the longevity and performance of your PVC roofing installation. You'll need to conduct systematic inspections throughout the installation process to guarantee material durability and proper adherence to installation techniques. Check all seams using a probe tool to verify complete fusion, and inspect the entire membrane surface for punctures, tears, or signs of improper attachment.
Perform water testing by flooding the roof area for 24-48 hours, maintaining a water depth of 50mm. Monitor the space below for any signs of leakage. You'll also need to verify proper drainage by checking that water flows freely to drains without ponding. Test all flashing details, particularly around penetrations and perimeter edges, using specialized electronic leak detection equipment.
Document all quality control procedures, including seam testing results, water test outcomes, and any remedial actions taken. You should photograph critical installation points and maintain detailed records of installation techniques used.
Create a final inspection checklist that covers membrane attachment, seam integrity, flashing details, and drainage patterns to make sure you haven't overlooked any essential elements.