When you're installing GRP fibreglass roofing in cold weather, you've got to guarantee the roof surface is spotless and bone dry. Start by checking the local forecast to pick a suitable day with temperatures ideally between 10°C and 20°C.
Store resins and hardeners in a heated area overnight, and always use a thermometer to verify material temperatures before application. Apply your mix early in the morning to capitalize on natural light and avoid moisture problems. Keep an eye on the weather throughout, and wrap up by mid-afternoon to allow adequate curing time before it cools off again.
There's more to explore that can help you master cold-weather installations seamlessly.
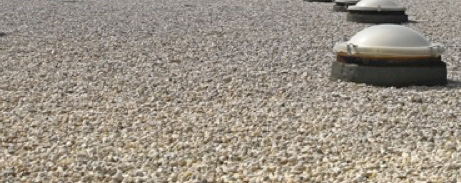
Preparing the Roof Surface
Before installing GRP fibreglass flat roofing, it's essential to properly prepare the roof surface.
You'll need to make sure the surface is completely clean and dry. Start by removing any debris, dirt, or loose material. Use a high-powered vacuum or broom for this step.
It's pivotal that no moisture, oils, or contaminants are left on the roof as they can interfere with the adhesion of the GRP material.
Next, check for any damage or irregularities in the roof structure.
You should repair cracks, splits, or blisters in the existing roof covering before proceeding. This might involve applying a primer or a patching compound compatible with GRP. Allow any repair materials to fully cure according to the manufacturer's instructions.
It's also important to guarantee the roof is completely flat and even.
Any unevenness can lead to pooling of the resin or topcoat, which compromises the effectiveness and longevity of the GRP roofing system. If necessary, sand down high points or fill in low areas to create a uniform surface.
Once these steps are completed, you're ready to move on to the application of the GRP system.
Checking Material Temperatures
Making sure your materials are at the right temperature is essential before starting the application of GRP fibreglass roofing.
You've got to store your resins and hardeners in a heated area overnight if temperatures dip too low. Ideally, they should be cozy at around 15 to 20 degrees Celsius. Anything below that and you're risking improper curing of the material, which can weaken your roof.
Don't just take a guess; use a thermometer to check the temperature of your materials before you begin.
If they aren't up to the mark, use a space heater or a hot box to gently bring them up to the required temperature. Remember, it's about warming them, not cooking them, so keep it gentle.
Also, check the temperature of the catalyst. It's often overlooked but just as pivotal.
If the catalyst is too cold, it won't work efficiently with the resin, leading to a longer curing time or even a failed application. Keep everything warm, but not hot, to guarantee the best results.
Application Timing Strategies
Timing your application correctly is pivotal when working with GRP fibreglass roofing, especially in variable weather conditions.
You've got to hit that sweet spot when the weather and temperature align to guarantee your roofing cures properly and lasts for years.
1. Early Morning Start: Begin your application early in the morning.
This strategy avoids the dew that can form overnight and certifies that the material isn't too cold, which can hinder curing.
2. Avoid Rainy Forecasts: While this might seem obvious, it's imperative to choose a day that promises clear skies.
Rain can't only delay the curing process but also affect the adhesion of the GRP to the roof deck.
3. Utilize Sunlight: Even in colder months, sunlight can appreciably assist in the curing process.
Position your start time to maximize exposure to natural light, enhancing the curing speed and effectiveness.
4. Wrap Up Before Dusk: Aim to complete the application before the temperature drops in the evening.
This avoids issues with moisture and certifies that your roofing has the best environment to set properly.
Weather Monitoring Essentials
Having mastered the timing strategies for GRP fibreglass roofing, you'll now want to focus on effectively monitoring the weather conditions.
First, always check local weather forecasts before planning your installation day. You need to guarantee the air temperature will be above 5°C to avoid any compromise in the curing process.
Remember, the ideal range for laying GRP fibreglass is between 10°C and 20°C. A temperature sensor can be invaluable here, helping you confirm that conditions are within this ideal range.
Make sure the substrate is bone dry before starting.
Any moisture can seriously hinder the curing of the laminate, leading to defects that could compromise the roof's integrity.
It's also wise to wrap up any fibreglassing or topcoating activities by 2-3 pm. This schedule allows enough time for the materials to cure before the temperature drops in the evening.
Lastly, be prepared for sudden weather shifts.
If rain begins unexpectedly, stop work immediately and cover any applied resin with a waterproof sheet.
Rain can alter the resin's properties and disrupt the curing process, potentially causing more headaches than waiting for a clearer day.
Edge Protection Techniques
Applying edge protection is crucial when installing GRP fibreglass roofing to prevent leaks and guarantee a durable finish.
Edge protection safeguards your roof against the rigors of cold weather.
1. Use a Drip Trim: Attach a drip trim along the lower edges of your roof.
This directs water runoff away from the fascia and into the gutter.
Make sure it's firmly aligned with the roof perimeter for peak performance.
2. Install a Raised Edge Trim: At the upstand walls and around the roof perimeter, fit a raised edge trim.
This creates a barrier that prevents water from splashing back onto the roof surface,
which is particularly important during heavy rain or melting snow.
3. Seal with Topcoat: After laying down the fibreglass mat and resin,
apply a generous layer of topcoat along the edges.
This not only seals them but also certifies that they're fully waterproof.
4. Secure with Fixings: Don't just rely on adhesives.
Use mechanical fixings at intervals along the trims to anchor them securely to the roof deck and upstand walls.
Resin Mixing Guidelines
When mixing resin for GRP fibreglass roofing, it's crucial to get the proportions right to guarantee peak performance and durability.
Especially in cold weather, the resin's behavior changes, so you've got to be extra careful. Always start by reading the manufacturer's instructions. They'll guide you on the correct ratios of resin to catalyst, which can shift with temperature changes.
You'll need to keep your resin and catalyst at a room temperature environment before mixing. If they're too cold, the resin won't cure properly, leading to a weak roof.
Use a digital scale for accuracy; guessing can lead to a poor mix and ultimately, a faulty roof. Mix thoroughly until you've got a consistent, streak-free blend. This confirms the catalyst is evenly distributed throughout the resin.
Be quick but precise in your application after mixing. The resin's pot life — the time it remains usable once mixed — can be shorter in colder weather. Don't mix more than you can use within this period.
Apply using standard tools and techniques, certifying an even distribution over the fibreglass mat. This careful approach will help you avoid unnecessary waste and certify a durable, robust roofing system.
Post-Installation Care
After installing your GRP fibreglass roof, always allow it to fully cure for the recommended period, typically several days, depending on the product and weather conditions.
During this vital time, you'll need to take specific steps to guarantee the durability and effectiveness of your new roof.
1. Keep It Clean: Don't let leaves, dirt, or other debris accumulate on the surface. These can trap moisture or chemicals that might interfere with the curing process and weaken the bond. Regularly check and clean the roof, especially after windy days.
2. Verify Proper Ventilation: Good airflow is essential. It helps evaporate any trapped moisture and dispels fumes from the curing resins.
Make sure your roof area is well-ventilated, which will aid in a stronger and more uniform cure.
3. Steer Clear: Resist the temptation to walk on your new roof. Pressure and weight can create dents or even cracks in the not-yet-fully-cured resin, compromising its integrity.
4. Regular Inspections: Once cured, inspect your roof periodically. Look for any signs of stress, such as cracking or bubbling. Early detection of potential problems can save you from bigger repairs down the line.
Rounding Up
As you wrap up your cold weather roofing with GRP fibreglass, remember to keep your materials warm, time your applications wisely, and monitor the weather closely. Certify your edges are well-protected and mix your resin accurately.
Don't forget the importance of post-installation checks to maintain the integrity of your roof. Investing in specialized training can substantially enhance your skills. By following these tips, you'll handle your winter roofing projects with confidence and efficiency.
Frequently Asked Questions
How Cold Is Too Cold for Fiberglass?
You're wondering how cold is too cold for fiberglass? Generally, it's best not to install fiberglass below 5 degrees Celsius, as the resin won't cure properly and could compromise the installation's integrity.
What Temperature Should a GRP Roof Be?
For your GRP roof, aim for a minimum temperature of 5 degrees Celsius during application to guarantee proper curing. Below this, the material may not set correctly, risking the integrity of your roofing project.
What Is the Temperature Limit for Grp?
You mustn't apply traditional GRP fibreglass below 5 degrees Celsius because it won't cure properly.