Torch-on felt flat roofing is a long established roofing method. But it can seem like a "dark art". We'll shine a light on it to expose all aspects and give you a thorough understanding of this roofing method.
Key Takeaways
- Torch-on felt roofing consists of multiple layers including a venting base, underlay, and a UV-protective mineral cap sheet.
- Proper installation involves surface preparation, sequential layering, and precise edge sealing with a gas torch.
- Regular maintenance, such as debris removal and drainage checks, extends the lifespan of the roof, typically between 15 to 25 years.
- Safety measures include using heat-resistant gear, maintaining a clear work area, and adhering to UK Building Regulations.
- Consider environmental impacts by choosing sustainable materials and disposing of old roofing responsibly.

Understanding Torch-On Roofing
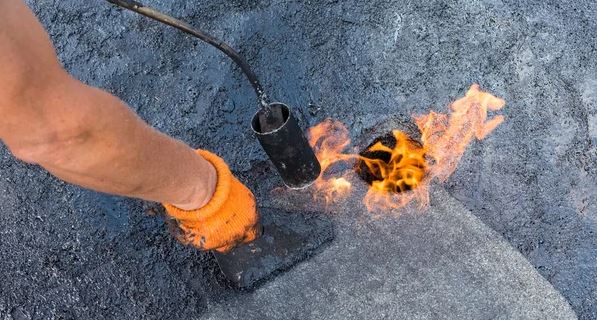
Torch-on roofing typically involves using a gas torch to melt bitumen felt onto your flat roof, creating a durable and waterproof seal. This method includes a three-layer system essential for peak performance.
The first layer, known as the venting base sheet, prevents moisture build-up. Next, the underlay layer adds an extra level of protection. Finally, the top layer, often a mineral cap sheet, shields against UV rays and physical damage.
When you opt for torch-on application, choosing a reputable manufacturer guarantees you're working with high-quality materials designed for longevity and resilience. Proper installation is key; it not only extends the lifespan of your roof but also prevents potential issues such as water infiltration which can lead to costly damages.
Always adhere to safety protocols during installation. The use of an open flame requires careful handling and adherence to specific guidelines to safeguard your safety and the effectiveness of the installation.
Benefits of Torch-On Felt
You'll appreciate that torch-on felt offers a waterproof moisture barrier, effectively preventing water infiltration and ensuing structural damage. This is important, especially for flat roofs where water pooling is a common issue.
The material's ability to shield your roof from water ensures a significant reduction in the risk of rot and mold, which can compromise the structural integrity of your building.
Additionally, torch-on felt enhances the longevity of your roof. With a lifespan of 15 to 25 years, you're investing in long-term protection that withstands various weather conditions. This durability is a key advantage, saving you money and hassle over time. The three-layer system, which includes a venting base sheet, waterproof underlay, and tough mineral cap sheet, provides thorough protection. Each layer plays an essential role in ensuring the roof's effectiveness and durability.
Moreover, the efficient water drainage facilitated by the felt's design further protects your property. By directing water away efficiently, you avoid issues associated with stagnant water. This feature not only prolongs the life of your roof but also maintains the aesthetic appeal of your property, ensuring it looks good and functions well for years to come.
Material Composition
The material composition of torch-on felt roofing includes bitumen-based felt sheets, often reinforced with layers such as polyester or fiberglass, ensuring both flexibility and durability. This combination makes your roof ready to withstand various weather conditions while maintaining its integrity over the years.
Here's what you need to know about the materials used in torch-on felt roofing:
- Bitumen: It's the core component that provides waterproofing and adhesive qualities. Bitumen's flexibility helps your roof expand and contract without cracking.
- Polyester or Fibreglass Reinforcement: These materials add strength and stability, preventing the roofing felt from tearing and ensuring it can handle structural movement.
- Mineral Granules: Often added to the top layer, these granules protect against UV rays, which can notably extend the life of your roof.
- Reflective Coating: This feature not only improves the aesthetics of your roof but also contributes to energy efficiency by reflecting sunlight away from the surface.
- Composite Layering: The strategic layering of these materials creates a robust barrier against leaks and external damage, effectively prolonging the lifespan of your flat roof.
Understanding these components helps you appreciate the resilience and efficiency of torch-on felt roofing, making it a smart choice for your flat roofing needs.

Required Installation Tools
To efficiently install torch-on felt roofing, you'll need a few key tools, including a gas torch kit to melt the bitumen effectively. Without this, you can't properly adhere the felt to the roof, which is important for a watertight finish.
You'll also require a sturdy trowel. Use it to smooth and press the bitumen as it melts, making sure it bonds well with the roofing substrate and between the felt layers. This step is essential to avoid any gaps or weak spots that could lead to leaks.
Next, grab a utility knife. It's indispensable for cutting the roofing felt to the right dimensions. You'll find it especially handy when you need to trim around obstacles like vents or pipes. Make sure the knife is sharp to achieve clean cuts, which help in sealing edges more efficiently.
Don't forget about your safety gear. You'll need thick gloves, protective goggles, and heat-resistant clothing to protect yourself from the high temperatures and potential splashes of hot bitumen.
Step-by-Step Installation Guide
Having gathered all the necessary tools and safety gear, let's start the installation process of your torch-on felt flat roofing. Here's a streamlined guide to help you guarantee a robust and waterproof installation:
- Prepare the Roof Surface: Clean the roof thoroughly, making sure it's free from debris, dust, and any moisture. This will help the adhesive layers bond effectively.
- Install the Venting Base Layer: Roll out your venting layer first, starting from the bottom of the roof and working upwards. This layer is essential for temperature and moisture regulation underneath the felt.
- Apply the Underlay: Next, position the underlay. Carefully align it and, using your gas torch, heat the underside until the bitumen melts and bonds to the base layer.
- Lay the Cap Sheet: The cap sheet is your topmost protective layer. Similar to the underlay, torch-apply this sheet to ensure it securely adheres. Overlap edges by at least 75mm for best waterproofing.
- Seal the Edges: Finally, focus on sealing all the edges and around any protrusions like vents or pipes. It's important to torch these areas thoroughly to prevent water ingress.
Safety Precautions and Regulations
Before you start applying torch-on felt to your flat roof, it's vital to familiarize yourself with the necessary safety precautions and regulations to avoid any hazards. Remember, you'll be working with naked flames and high temperatures, which makes this job particularly risky. It's important to adhere to the UK Building Regulations and relevant Codes of Practice, as well as British Standards for safe working practices.
Firstly, make sure you're equipped with the right safety gear. This includes heat-resistant gloves, eye protection, and suitable footwear to protect against accidental burns. The area where you'll be working should be clear of any flammable materials to prevent fire risks.
Always use a gas torch kit that's in good working condition and check it before you begin. Faulty equipment can lead to serious accidents. If you're not confident in your ability to safely handle the equipment, it's preferable to hire a professional. Besides having the necessary skills, professionals are also insured against potential accidents, which provides an extra layer of security.

Maintenance Tips
Regular maintenance greatly enhances the longevity and performance of your torch-on felt flat roofing. By dedicating time to routine care, you'll ensure that your roof remains in top condition, safeguarding your property against the elements. It's not just about fixing problems as they arise; it's about preventing them in the first place.
Here are some key maintenance tips to keep in mind:
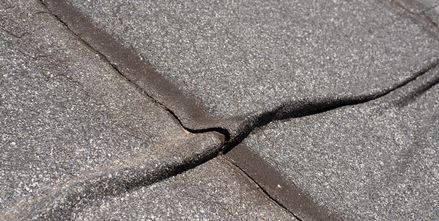
- Inspect Regularly: Check your roof frequently for any signs of damage, such as cracks or tears. Early detection can save you from costly repairs down the line.
- Clean Debris: Remove leaves, twigs, and other debris that can accumulate on your roof. This helps prevent clogging in your drainage systems, which could lead to water pooling and eventual damage.
- Maintain Ventilation: Good airflow is essential. Make sure your roof is well-ventilated to avoid moisture buildup and condensation, which can weaken the roofing material over time.
- Check Fasteners: Periodically check for loose or missing nails and resecure them as necessary to maintain the structural integrity of your roof.
- Professional Check-ups: Schedule an annual inspection with a roofing professional to catch any issues you might've missed and to keep your roof in excellent condition.
Signs of Roof Replacement
You should consider replacing your torch-on felt flat roof if you notice visible damage such as cracks or tears. These imperfections can compromise your roof's ability to protect your home from water, potentially leading to more severe issues.
Leaks during rainstorms are another tell-tale sign. If you're catching drips or see water stains on your ceiling, it's a significant indication that your roof's integrity is compromised. This issue can escalate quickly, damaging the interior of your home.
Don't overlook the age of your roof. If your torch-on felt is approaching or has exceeded its typical lifespan of 15 to 25 years, it's wise to start planning for a replacement. Roofing materials wear down over time, and older roofs are more prone to problems.
Watch for excessive wear and tear. Loss of granules from the mineral cap sheets, or a general brittleness in the felt, are strong indicators that your roof is losing its effectiveness. It's essential to address these issues promptly to avoid extensive damage.
Regularly inspect your roof for any signs of deterioration like sagging or additional water staining. Catching these early can save you from more extensive and expensive repairs down the line.
Cost Analysis
Understanding the costs involved in torch-on felt flat roofing is crucial as you plan your budget. This durable roofing option, while offering significant longevity and protection, comes with various costs that you should consider. It's not just about the materials; several other elements play into the final price.
Here's a breakdown to help you better grasp what you're investing in:
- Material Costs: The felt itself costs between £40 and £80 per square meter. Remember, the quality of materials can affect both the cost and the lifespan of your roof.
- Labour Expenses: Depending on the complexity of your roof, installation can require a skilled team, costing between £150 and £300 per day.
- Additional Supplies: Necessary items like gas torch kits are essential for the application of torch-on felt.
- Insulation and Decking: If your project requires new insulation or decking repairs, these will add to the overall cost.
- Roof Trims: Don't forget the finishing touches. Trims not only enhance the appearance but also contribute to the structural integrity of the roofing system.
Carefully evaluating these costs will ensure you're prepared and can manage your roofing project effectively without unwelcome financial surprises.
Environmental Considerations
When considering torch-on felt flat roofing, it's important to weigh its environmental impact and explore sustainable alternatives. You've got options like green roofs or using recycled materials that greatly reduce your roofing's ecological footprint. Not only do these choices support the environment, but they also add a layer of energy efficiency to your property.
Think about how you can lower your carbon footprint with your roofing project. Energy-efficient solutions such as insulating materials or reflective coatings can decrease the amount of energy your building consumes, helping you contribute to sustainability. It's a win-win—you save on energy bills and help the planet.
Also, don't overlook the importance of properly disposing of old roofing materials. Ensuring these materials are disposed of or recycled responsibly minimizes the potential waste and pollution from your roofing project. This step is essential in keeping environmental harm to a minimum.
Lastly, choosing materials that have a minimal environmental impact during their life cycle is a proactive way to promote eco-friendly practices. Implementing these sustainable roofing practices isn't just good for the earth; it sets a precedent for future projects, guiding them towards greener alternatives in torch-on felt flat roofing.
Rounding Up
Now that you're armed with the ins and outs of torch-on felt flat roofing, you're ready to weather any storm that comes your way.
Keep up with regular maintenance and stay vigilant for signs of wear.
Investing wisely now means you can rest easy later, knowing your roof is solid as a rock and your sanctuary is secure.
Frequently Asked Questions
How Many Layers of Torch on Felt on Flat Roof?
You typically need three layers of torch-on felt for your flat roof: a venting base layer, a waterproofing underlay, and a top mineral cap sheet to guarantee durability and weather resistance.
How to Do a Torch on Felt Roof?
To do a torch-on felt roof, you'll heat layers of bitumen sheets with a gas torch, ensuring each layer bonds well for a waterproof seal. Always wear protective gear and follow safety guidelines.
Do I Need Underlay for Torch on Felt?
Absolutely, you definitely need underlay for torch-on felt! It's your roof's unsung hero, boosting both waterproofing and insulation, ensuring your felt application is not just good, but monumentally better in performance and durability.
What Is the Best Way to Felt a Flat Roof?
For felting a flat roof, you'll want to use a three-layer torch-on system. It's the most effective for waterproofing and durability. Make sure to follow safety guidelines closely during the application process.


