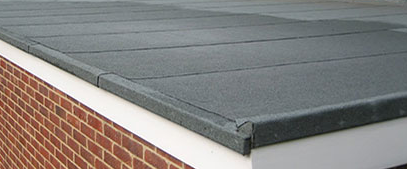
Here, we'll show you some straightforward, effective methods to improve your flat roof corner felting. These techniques not only protect your roof from water damage but also enhance its overall look.
First, ensure you have the right materials. Use high-quality roofing felt and appropriate adhesives that are designed for outdoor use and can withstand various weather conditions. This choice is important because quality materials extend the life of your roof and reduce future repair needs.
Next, measure the area accurately before cutting the felt. Accurate measurements prevent material waste and ensure a neat, seamless fit, especially at the corners. When applying the felt, start from the bottom of the roof and work your way up, overlapping each layer by at least three inches. This overlap is vital as it prevents water from seeping through the layers.
For the corners, cut the felt into strips that fit precisely, and apply a bit of extra adhesive to secure them. Press down firmly to ensure there are no air bubbles or gaps where water can enter.
By following these specific steps, you not only ensure that your flat roof is well-protected against the elements but also maintain a clean, attractive appearance that can enhance the overall value of your property.
Key Takeaways
- Begin by thoroughly cleaning the corners of the roof before you start felting. This is crucial as dirt and debris can prevent the felt from sticking properly, ensuring that the felt adheres well and provides a reliable waterproof seal.
- Next, take precise measurements of the area you need to cover with felt, making sure to add extra length for overlap. Overlapping the felt sheets by at least a few inches is essential for creating a watertight barrier, which will help prevent water from seeping through the seams.
- Carefully fold the felt around the corners, making sure it lies flat and smooth. This step is important to avoid creating spaces where water can enter, thereby enhancing the roof's overall water resistance.
- Use a strong adhesive to attach the felt to the roof, and reinforce it with nails for added durability. This dual approach helps the felt stay in place even under harsh weather conditions, providing long-lasting protection for the roof.
- Finally, trim any excess felt so that it fits neatly along the edges of the roof. For additional protection, apply fiber trims at the edges. These trims not only improve the appearance of the roof but also serve as an extra barrier against water, ensuring that the roof remains dry and damage-free.
By following these steps, you can effectively felt the corners of a flat roof, enhancing its durability and resistance to weather-related damage.
Preparation for Felt Roof Corners

Before you begin applying felt to the corners of your flat roof, it's crucial to ensure these areas are clean and free from any debris. This initial cleaning step is important because it ensures that the felt adheres properly to the roof, resulting in a smoother and more effective finish.
Simply use a broom or brush to sweep away any accumulated dirt, leaves, or miscellaneous debris. Also, take a moment to check the corners for any signs of damage or loose materials. Addressing these issues before you start felting will help prevent future problems and ensure a more durable roof.
Cutting and Measuring Felt
Before you start working on the corners of your flat roof, ensure that the area is clean and devoid of any debris. This is crucial because a clean surface ensures that the felt adheres well and lies flat, avoiding any future issues with water leakage.Accurately measure the needed dimensions for the corner and mark the felt accordingly. It's important to allow for proper overlap to create a waterproof barrier. Use a sharp utility knife for cutting the felt precisely along the marked lines. This precision is key to ensuring the felt fits snugly around the corner, preventing water from seeping underneath.
Once cut, firmly nail the felt in place at the corner. This step prevents the roofing felt from moving or lifting, which can compromise the roof's integrity. Additionally, apply a good amount of adhesive under the felt to strengthen the bond and increase the roof's overall durability.
These thoughtful steps are crucial for a successful installation, ensuring your flat roof remains protected from the elements. By following this process, you can achieve a durable and effective seal at the corners of your roof, safeguarding your property against water damage.
Folding Felt Around Corners
When installing felt on flat roof corners, it's crucial to trim any excess material to ensure a smooth fit. Here's why and how to do it properly:1. Trim Excess Felt:
Start by cutting away surplus felt. This step is essential because it ensures that the felt fits precisely around the corner without bunching up, which could lead to leaks.
2. Smoothly Fold the Felt:
Carefully fold the felt over the corner. This should be done smoothly to prevent any gaps or wrinkles that might allow water to seep through.
3. Secure with Nails:
After folding, secure the felt with nails. This not only keeps the felt in place but also strengthens the seal against adverse weather conditions.
4. Guard Against Wind Damage:
Properly secured felt corners are less likely to be damaged by wind, which helps prevent water from getting under the felt and causing damage to the roof structure.
Securing Felt With Adhesive
Begin by applying a generous amount of felt adhesive to the corner of the roof. It's crucial to apply the adhesive thoroughly over the corner to ensure a strong bond with the roof's surface.Spread the adhesive evenly to avoid any areas that might be prone to leaks. Firmly press the felt into the corner to make sure it sticks well and to stop water from getting through.
Use a roller to smooth the felt, removing any air pockets or creases that could weaken the seal. Let the adhesive dry fully before you add nails or more adhesive for extra strength.
This step is vital for maintaining a leak-free and durable flat roof. By taking these measures, you're effectively securing the felt and safeguarding your roof against water damage.
Trimming Excess Felt
Trimming excess felt from the corners of a flat roof requires precise cutting to ensure a professional look. Here's a straightforward guide to help you do it correctly:Use a Sharp Knife:
A sharp utility knife is crucial for making clean, precise cuts. This prevents the felt from fraying at the edges, which can lead to a shabby finish.
Aim for Precision:
It's important to cut the felt so that the edges are straight and even. This not only enhances the roof's appearance but also ensures better waterproofing.
Protect the Roof:
While cutting, be careful not to damage the roof structure underneath. A slip of the knife can cause unnecessary damage that might lead to leaks or other issues.
Adjust as Needed:
Initially, cut the felt slightly longer than you think necessary. You can then trim it down to the exact size needed. This method allows room for error and ensures a perfect fit.
Enhancing Protection With Fibre Trims
Boost the durability of your flat roof corners by using fiber trims, which add an extra layer of protection against water leaks and ensure a neat finish. Fiber trims are designed to bond effectively with the roof felt, establishing a durable edge that helps keep water out of the areas where the felt edges meet. This additional step not only strengthens your roof but also maintains its appearance.The main role of fiber trims is to fortify the corners of flat roofs, securing a reliable finish that extends the roof's lifespan. These trims stick to the roof felt, crucial for preserving the roof's overall structure. Moreover, the neat finish they provide enhances the look of your roof corners. Integrating fiber trims during the installation of your flat roof corners is vital for both enhanced protection and improved aesthetics.
For instance, consider a flat roof that has been exposed to frequent rainfall and intense weather conditions. By incorporating fiber trims, the roof corners are better protected against potential water damage, which can lead to costly repairs if left unchecked. This practical example underscores the importance of using fiber trims for both functional and aesthetic benefits.
Achieving a Clean Finish
When you're working on the corners of your flat roof, ensuring a clean finish is crucial. Here's how you can achieve that:- Proper Overlapping: It's essential to overlap the roofing felt correctly at the corners to create a watertight barrier. This prevents water from seeping in, which can cause damage over time.
- Neat Trimming: For a sharp, professional look, use a sharp utility knife to cut away any extra felt. This not only enhances the appearance but also prevents the felt from becoming a catch point for water or debris.
- Secure Attachment: Fix the felt securely with clout nails or a strong adhesive. This stability helps the felt withstand wind, rain, and changes in temperature without shifting or peeling.
- Reinforcement: To further protect against water, apply an extra layer of adhesive or sealant at the corners. This extra step significantly boosts the roof's resistance to leaks.
Maintenance Tips for Felted Corners
To effectively maintain the corners of your felted flat roof, it's crucial to conduct inspections regularly. During these checks, look for any lifting or loosening of the felt, which can compromise the roof's integrity. Ensure that the corners are securely sealed to block any water from seeping in, which prevents leaks. When securing these corners, use nails, adhesive, and proper folding methods for a robust fit. It's also important to trim off any extra felt to keep the roof looking neat and to help it last longer.Moreover, applying a protective coating or sealant to the felted corners can significantly boost their resistance to weather conditions. If you notice any issues, addressing them quickly is vital for preventing more extensive damage and preserving the roof's structure.
Rounding Up
After mastering the technique of felting flat roof corners, you can ensure your roof remains effectively waterproof and protected. By adhering to these guidelines, you'll attain a neat and professional appearance that contributes to your roof's longevity.It's important to regularly check and upkeep these corners to avert potential problems. Applying these methods and maintaining diligent care will keep your flat roof corners in excellent condition for many years.
This proactive approach not only saves you from future repairs but also extends the life of your roof.


